Reviewed by Ottmega Editorial Team • Last updated Nov 17, 2025
How to Remove the Danger Zone in Canva (Fast Fix)
Introduction
The red “Danger zone” in Canva can be alarming—especially when your design looks perfect until that banner shows up. The good news: it’s not an error. It’s a helpful warning for print layouts, and you can either hide it or fix what’s causing it in a couple of quick steps.
This guide explains what the Danger zone means, how to remove or disable it, and how to make print-ready designs that won’t get text or logos chopped off at the edges.

What the Danger Zone Actually Means
Canva’s Danger zone highlights areas near the page edge where trimming can occur. Commercial printers cut stacks of paper at high speed. Even with calibrated machines, tiny shifts happen. The Danger zone reminds you to keep important content away from the risky edges.
Think of three concentric areas:
-
Bleed: the artwork that extends beyond the final trim to avoid white slivers.
-
Trim line: the intended final cut.
-
Safe zone (margins): the inner area where text and logos should live.
If any element (usually text) gets too close to the trim, Canva shows the red overlay to warn you.


Quick Ways to Remove the Warning
Option 1: Hide the overlay (for digital-only designs)
If your graphic is only for screens, you don’t need print warnings.
Steps:
-
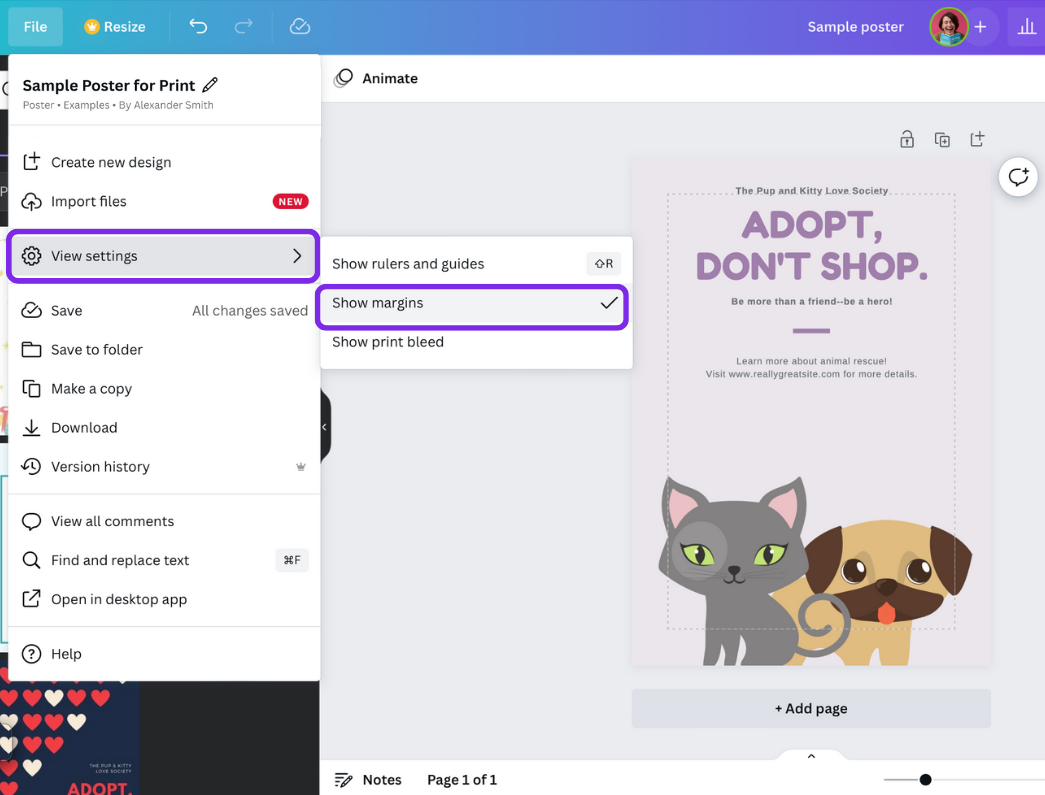
Go to File → View settings.
-
Untick Show Danger zone detection.
-
Optionally untick Show margins and Show print bleed.
Result: The red overlay disappears. Your design is unchanged, just a cleaner workspace.
Option 2: Fix the layout (for anything you’ll print)
If you plan to print, keep the overlay—it’s trying to save your design.
Steps:
-
Turn on guides: File → View settings → Show margins and Show print bleed.
-
Move important content inside the safe area (inside the broken-line margin).
-
Extend backgrounds/photos to the page edges so they cover the bleed.
-
Recheck: If text still triggers the Danger zone, nudge it inward or reduce font size slightly.
-
Export: Share → Download → PDF Print → tick Crop marks and bleed.
Result: The overlay disappears when elements are no longer too close to the edge, and your file is safer for print.
When Should You Hide vs Fix?
| Situation | Best Action | Why |
|---|---|---|
| Social post, story, reel, web banner | Hide Danger zone | Not for print; edge trimming isn’t relevant. |
| Flyers, cards, invitations, posters, business cards | Fix layout | Real cutting tolerance can nip text; keep content inside safe zone. |
| You’re proofing layout spacing | Keep Danger zone on | Helps you spot risky elements quickly. |
| You’re done and exporting for a printer | Keep margins/bleed on, export with crop marks & bleed | Ensures clean edge-to-edge color and no white slivers. |
The Simple Print-Safe Formula
Follow this every time you print from Canva:
-
Turn on Show margins and Show print bleed.
-
Keep all text/logos fully inside the margin guides.
-
Stretch backgrounds and decorative images to the edges (covering the bleed).
-
Export as PDF Print with Crop marks and bleed checked.
Do these four steps and you’ll avoid 95% of common print issues.
FAQs You’re Probably Thinking About
Will the printer cut on the safe line or the bleed line?
Neither. The cut aims for the trim line—between safe area and bleed. The safe area protects important elements from small cutting shifts. The bleed ensures color and photos go past the edge so no white hairlines show.
If I keep everything inside the safe zone, will my design look too “inset”?
Not if your layout is balanced. Try these tips:
-
Use slightly larger font sizes for headlines to maintain presence.
-
Add breathing room around the edges; it makes designs look more premium.
-
Let backgrounds and textures run to the bleed so the card still feels full-bleed and modern.
What’s Canva’s default bleed?
Typically 0.125 inches (3.175 mm) on each side for products that trim. Margins are intentionally wider than the Danger zone to keep text comfortably safe.
My design is still triggering Danger zone. What element causes it?
Common culprits:
-
A stray text box used as a decorative line near the edge.
-
A logo placed too close to the top or bottom.
-
An image caption that snuck outside the margin after resizing.
Turn on Show rulers and guides, zoom to 200%, and move each suspect element slightly inward.
Step-by-Step Troubleshooting Guide
1) Double-check your canvas type
-
If it’s a print format (business card, flyer, poster), keep Danger zone detection on while you adjust.
-
If it’s a digital format (Instagram, YouTube thumbnail), turn it off to avoid distractions.
2) Align text and logos with smart guides
-
Use Canva’s snap-to guides for perfect spacing.
-
Add vertical/horizontal guides where needed: File → View settings → Show rulers and guides, then drag from the rulers.
3) Respect minimum font sizes for print
-
As a rule of thumb, avoid going below 7–8 pt for body text on small prints like business cards.
-
Print a home test on regular paper at 100% scale to check legibility.
4) Use high-resolution images
-
For print, 300 dpi images are ideal.
-
If an image looks pixelated at 200% zoom in Canva, reduce its on-canvas size until it looks crisp again.
5) Export the right way
-
Share → Download → PDF Print
-
Tick Crop marks and bleed
-
If a printer requests CMYK, ask if they accept Canva PDF Print as is, or if they require converted CMYK. Many modern shops handle conversion.
Pro Layout Tips So You Never See the Warning Again
Design to the safe area first
Start with the margins visible. Place all communicative elements (logo, headline, dates, addresses, CTA) inside that inner box. Treat the outer rim as purely decorative.
Build edge interest without risk
-
Add a border or color band that extends into the bleed so it trims cleanly.
-
Use a subtle texture or gradient background that bleeds off the edges.
-
Keep text on solid or high-contrast areas inside the safe zone.
Balance hierarchy
If moving a headline inward makes the design feel cramped, increase top/bottom padding consistently or increase the overall font size to maintain impact without creeping into the Danger zone.
Use a quick “edge audit”
Before export:
-
Zoom to 200%.
-
Trace around the whole edge with your eyes.
-
Look for any character, icon, or decorative element that touches or nearly touches the trim—either pull it in or let it intentionally bleed if it’s background-only.
Common Mistakes to Avoid
-
Shrinking everything just to escape the Danger zone. Instead, rearrange and adjust margins consistently.
-
Letting photos end exactly at the trim line. Always extend to the bleed.
-
Exporting without crop marks and bleed for print orders.
-
Placing QR codes near edges. Keep them well inside the safe zone for reliable scanning after trimming.
Sample Workflow You Can Copy
-
Open your design.
-
File → View settings → Show margins, Show print bleed, Show Danger zone detection.
-
Drag all text and logos inside the margins.
-
Stretch background shapes or images to reach the outer edge (bleed).
-
Do a 200% zoom lap around the edges.
-
Export as PDF Print with Crop marks and bleed checked.
-
Optional: Print a single proof at home or with your print shop before the full run.
Mini Cheat Sheet
-
For digital: turn Danger zone off.
-
For print: keep it on while editing, then export with bleed and crop marks.
-
Text/logos inside the margins, backgrounds to the bleed.
-
Aim for clean negative space; it makes the design feel intentional and premium.
Conclusion
The easiest way to remove the Danger zone in Canva is to either disable the overlay for digital projects or fix your layout for print by moving text inside the safe area and extending backgrounds to the bleed. With margins and bleed turned on—and a quick export using PDF Print plus crop marks—you’ll avoid trim surprises and ship designs that look great in hand. That’s how you remove the Danger zone in Canva the right way.